Navigating the Contract Review System
Before submitting a contract request for review, make sure you have the following information:
Contract Type
Contract Value
Project ID (required for all expense contracts)
Supplier ID (required for all expense contracts). Refer to the following Knowledge Base article for instructions: How do I invite a supplier to PaymentWorks?
Vendor contact name and email (for questions and to route the DocuSign for external signature)
Contract document, including scope of services (if appropriate)*
Waiver of Competitive Bidding (Sole Source) (needed for services above $5,000)
Independent Contractor Checklist (if appropriate)
Once you have these items, you are ready to submit your contract for review!
*The preferred method of upload is Word document (unless on Standard University Agreements).
Find a Supplier ID in the Contract System
When submitting a contract for review, a supplier name is required. For all expense contracts, a Supplier ID is also required. Having a Supplier ID means that the supplier has been set up in the Financial System. For zero-dollar-value and revenue-generating contracts, a Supplier ID is not required and the supplier name can be entered in the Supplier Name field.
To find an existing supplier and supplier ID for your contract:
- Start typing the name of the supplier into the Supplier Name field.
- Use the autofill drop-down menu to select your supplier if found.
- If not found, click on the magnifying glass to open the “Look Up Supplier” pop-up window and see all records corresponding to that name or keyword.
- Once found, click the “Select” button to add the supplier to your contract review form.
- The supplier ID will auto populate and you will be able to submit the form upon completion of other required fields.
What if I happens can’t find my supplier?
This means that the supplier has not been registered in the Financial System. You must set them up with Supplier Information Management. Here’s how…
ONBOARD A NEW SUPPLIER
To onboard a new supplier, you will need to send them an invitation to register with PaymentWorks. Once the supplier has completed the registration process, you will receive an email with their Supplier ID. The new supplier will be available in the contract system the day after you receive their Supplier ID.
The first time that you authenticate into the new contract management system in any browser, you will have to disable the pop-up blocker. Please follow the instructions below.
(Note: These step-by-step instructions are for Chrome.)
- Navigate to the contract system via the Contract Review webpage or in the Portal using the Purchasing Contracts tile.
- A pop-up window will appear in the middle of your screen with a warning message. Don’t click on the OK button yet.

3. In the browser URL bar, to the right you will see a pop-up blocker notification. Click on this pop-up blocker icon.

4. In the new pop-up blocker window, select the “always allow…” button and click the “Done” button.

5. Now you can click the “OK” button in the warning message pop-up window.
To add the tile to one of your homepages in Financials:
Each contract has a status that provides a general idea of where the contract is in the review process.
Here’s what each of them mean:
| CONTRACT STATUS | DESCRIPTION |
| Draft | An unsubmitted contract OR a previously submitted contract that was rejected during approval process |
| Pending Approval | Your submitted contract is currently being reviewed by necessary approvers and is still awaiting full approval* |
| Waiting on Department | Purchasing needed further information so reached out via email or phone and is awaiting department user response |
| Negotiating with Supplier | Your contract has been sent to vendor and is currently being negotiated |
| Approved | Your contract has been reviewed and approved by all approvers and the DocuSign envelope is being sent out to the appropriate signatories |
| Pending Signature | A DocuSign envelope has been sent to the signing parties and is awaiting signature |
| Signed | Your contract has been fully signed by all parties and you have been notified by email |
| Active | Your signed contract’s term is currently in effect |
| Expired | Your signed contract’s term is no longer in effect |
| *You can check on where the contract is pending at the approver level by navigating to the Approvals tab of the contract record |
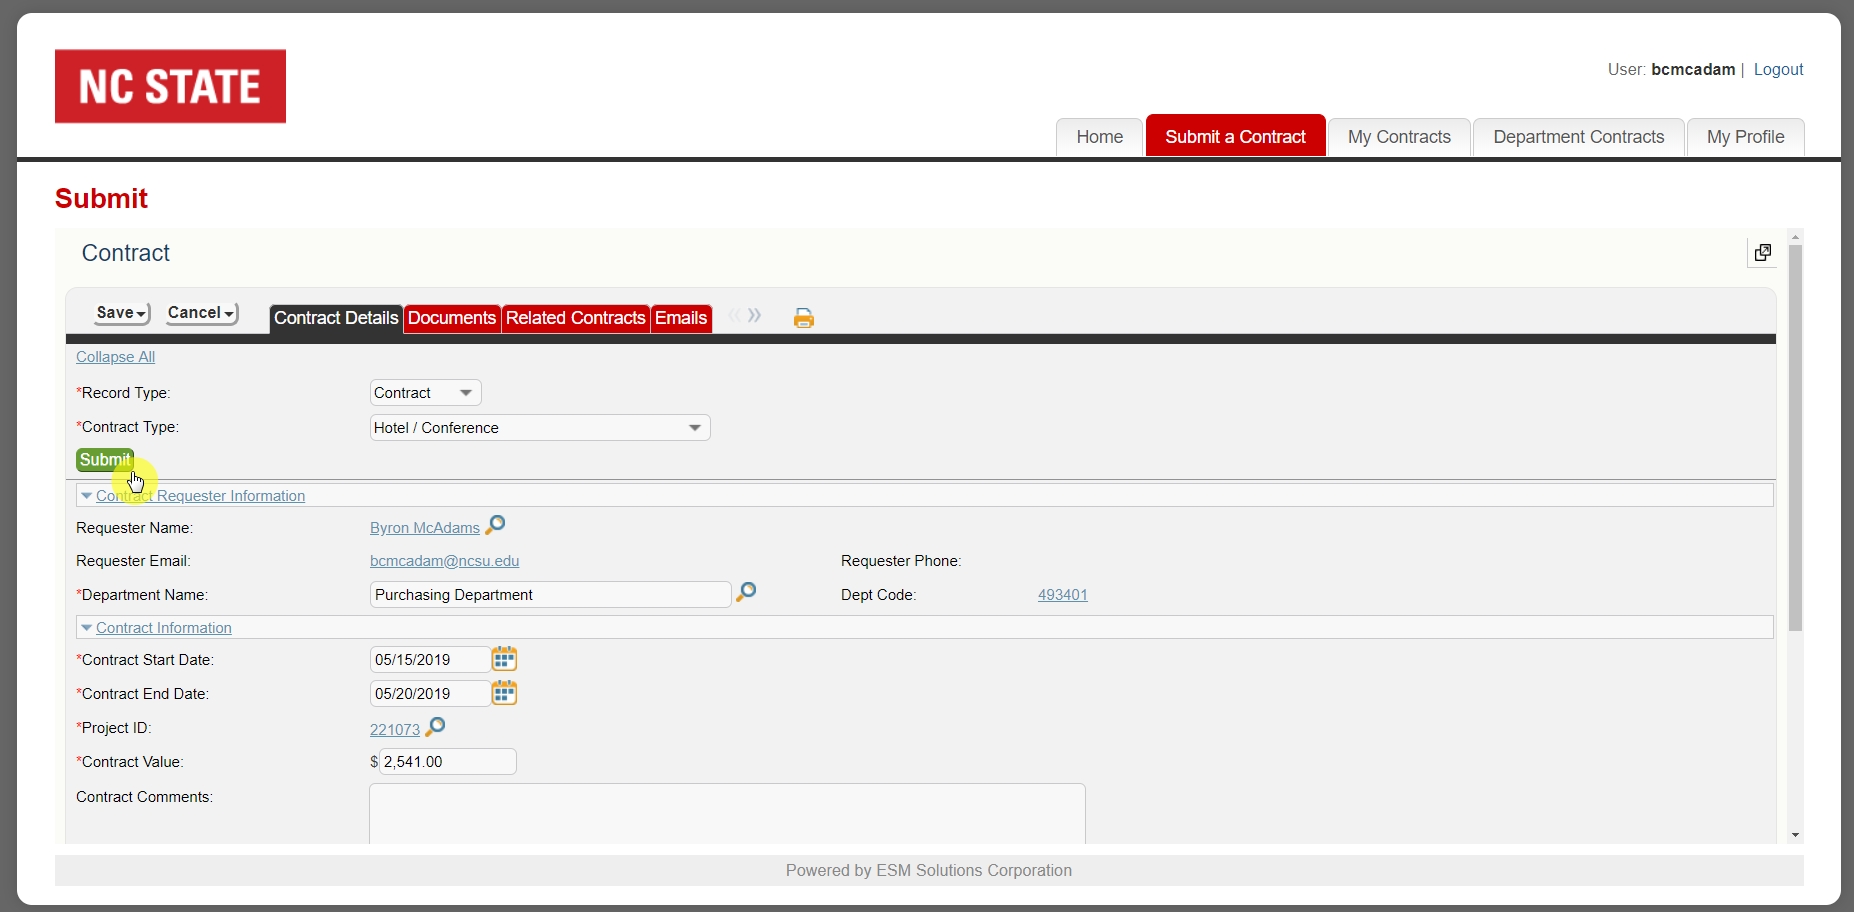
Your contract is in a draft status because you haven’t submitted for review yet. Each form has a save/cancel buttons that allow you to create drafts of contracts, but in order to submit these drafts for review, you must click the green “Submit” button.
Here’s where it’s located on the form. Note: You must have all required fields completed and a document attached in order to submit a contract request.

*Contracts may also be in a status of draft because the contract was rejected by an approver due to missing or incorrect information. You will receive an email regarding the rejection and any action needed. The contract is reset to draft so you can edit and resubmit if appropriate.
Once you submit your contract for review, you no longer have the ability to edit the contract. But you will be able to view exactly where the contract is in the approval process. Don’t worry, you will receive an email once the document is signed!
If you need to make a change on the contract request, please email purcontracts@ncsu.edu.
of the signed agreement is sent to each of the signatories and you, the requester, are sent an email notifying you that the contract has been signed.
In that email, there is a hyperlink to view the contract in the contract management system.
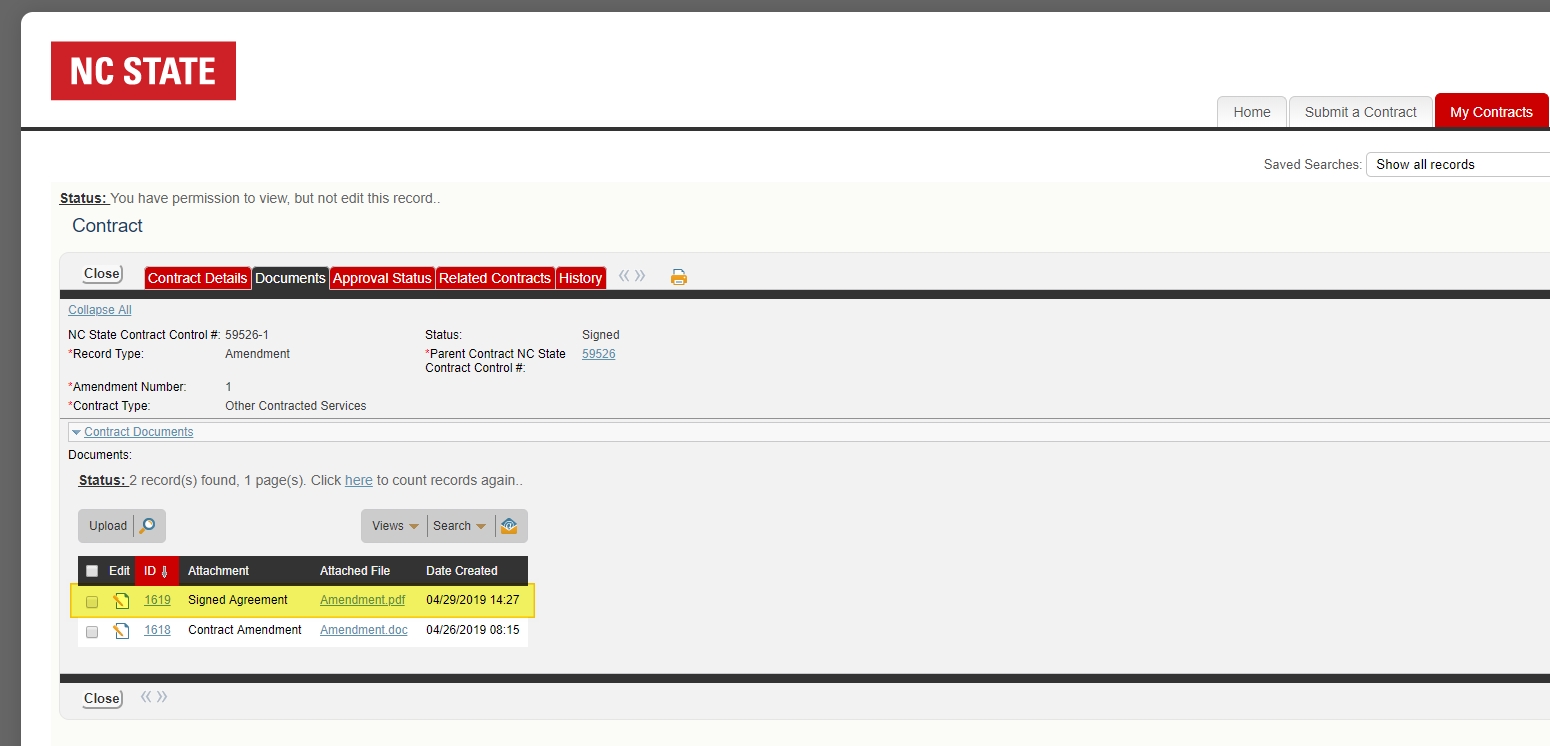
- Click on the link in the email
- Click on the “Documents” tab
- Under the Contract Documents section, find the new attachment labeled “Signed Agreement”
- Click on the attached file to view and download a copy of the signed agreement

You can also use the My Contracts tab to monitor the status of all contracts.
Navigate to your contract draft and click on the “Documents” tab.
- Click on the edit icon of the document you need to replace
- Click the “Attach/Manage” link
- Click the trash can icon to remove the document you accidentally uploaded
- A message will appear asking you to delete the latest version or all versions. Select Delete All Versions if you are trying to replace the whole document (and not just a version)
- The document will be removed from that window. Click the “Attach Files” button to browse out and select the correct document
- Click “Finish” and “Save”
- You will see the old document has been replaced by the newly uploaded document
